The Challenge
In keeping with my tendency to prefer to build/develop a solution instead of just buying something off the shelf, I’ve completed a super quick and satisfying solution for my new Kobalt tool chest. I wanted some localized lighting while working in the top work area. I looked online to see what was available commercially and found this. Yeah, no way I was paying that much for that, just the justification I needed to go and find myself a DIY solution. Initially, I was going to use a magnetic switch I had laying around to switch a LED strip I had on and off when the lid was opened and closed, but it wasn’t up to the task of handling the current my 12V LED strip consumed. The switch was rated at 100mA, and my LED strip tested out at about 370mA. I’ve used transistors as switches in the past but didn’t have any on hand that could handle that current and not get super hot to the touch. While I know there are far simpler solutions, I liked the idea of trying out some new things. Specifically, with this project, I wanted to learn better how to deal with thermal dissipation and using MOSFETs as switches. I did, however, have a few MOSFETs, and so I decided to try using the magnetic switch to drive the MOSFET, which was rated at like 40A, and I could use the PCB to dissipate any heat, not that I expected it even to get warm.
PCB Design & 3D Printing
The PCB design took me all of about an hour and then I went on to building an enclosure I could print for it, I’m really enjoying 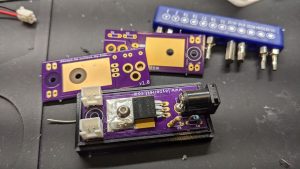 learning more about Fusion 360, they now let you import your Eagle PCB into your 3D design, which drastically simplifies getting a perfect fit with the first print. I modeled a quick enclosure that would fit the PCB and components and waiting on my boards from OSHPark.com.
Installation
Installation was pretty simple, I grabbed a 12V 2A power supply I had laying around (I never throw away a working power supply) and with a bit of black hot glue, had everything installed and ready to test out. Voila, I had an automatic LED light that cost me all of about $15.00USD, and I learned a whole lot about how to build thermally isolated dissipation pads on PCBs, drive MOSFETs as switches and import Eagle Cad PCBs into Fusion 360 to simplify enclosure modeling.
Results & Lessons Learned
Overall, I’m super happy with how this turned out; now, I need to find the time to move my tools to their new home!
Project Files
As always, you can find all the project files for this project, including STL files for 3D printing, the enclosure on my Github repository for this project.